Monday, October 5, 2009

Drop C Tuning

----------------------------------------------------------|| D
----------------------------------------------------------|| A
----------------------------------------------------------|| F
----------------------------------------------------------|| C
----------------------------------------------------------|| G
----------------------------------------------------------|| C

Drop C Guitar Tuning: C G C F A D

Drop C Tuning is very similar to Drop D, if you tuned to Drop D then dropped everything 2 semi-tones down you would be in Drop C. That being said it gives us some clues to how we can accomplish it. I am sure there are other methods, but this one I find simplest. Let’s use standard tuning as a starting point, since it’s the most poplular. If you aren’t already in standard guitar tuning, tune to it now, you can use this guitar tuner if you need to.

Step 1: Tune You Guitar To Drop D

Now that you are in standard guitar tuning, tune your low E down to a D, so you are in drop D. Here is a drop D guitar tutorial if you need it.

Now that you low E is a D, you can tune the rest of the guitar down 2 semi-tones by following the regular standard tuning pattern and using the Dropped D as a reference tone.

Step 2: The G String (5th)

Now that your low E is a D, Place the first finger of your left hand just behind the fifth fret on the bottom of the 6th string. That is now a G note. Keep your finger on that fret. Now pick the fifth and six strings in turn, loosening the fifth string tuning peg until the pitch of the two notes are the same.

Step 3: The C String (4th)

Place the first finger of your left hand just behind the fifth fret on the G string. That’s a C note. Tune the 4th string to that.

Step 4: The F String (3rd)

Place the first finger of your left hand just behind the fifth fret on the C string. That’s a F note. Tune the 3rd string to that.

Step 5: The A String (2nd)

Place the first finger of your left hand just behind the fourth fret on the F string. That’s a A note. Tune the 2nd string to that.

Step 6: The D String (1st string)

Place the first finger of your left hand just behind the fifth fret of the A string. That’s a D note. Tune the 1st string to that.

Step 7: Tune the thickest string to a C

Okay so now your tuning from top down should look like this D G C F A D - the one final step is to drop the thickest string down to a C. Use the forth string open as a reference tone to do this, much like you did with Drop D. You can test if you got it right by playing a D major shape, which is now a C Chord.

Tuesday, September 8, 2009

-WTS- X3 Live POD Line 6 -SOLD-


I dont have to let you guys know what the hell is this, but it is available again!

Price RM1,700.00 (nett)
Call me 019-5757953 Boi

Wednesday, September 2, 2009

How Guitar pickups work?

A guitar pickup is a very simple electro-magnetic device, which would be instantly recognisable to Michael Faraday, the great pioneer of electromagnetism.

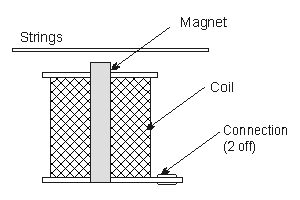
Construction of a typical single coil pickup
Construction of a typical single coil guitar pickup

In its simplest form, the standard "single coil" guitar pickup, as fitted to Tele or Strat style instruments, the pickup consists of (usually) six permanent magnets, with several thousand turns of fine copper wire wound around them. To those of you who still have a distant memory of physics lessons in school, this should bring to mind the definition of a basic generator or dynamo - "The production of an electrical potential difference (or voltage) across a conductor situated in a changing magnetic flux". The vibrating steel string cutting the lines of magnetic flux causes the change in flux in the "conductor", ie the coil of copper wire.

As guitarists who use instruments equipped with single coil pickups will testify, they are equally effective at picking up stray 50 or 60Hz fields radiated by AC mains wing and equipment as they are at picking up the vibration of the strings! I am sure we have all ended up playing our guitars in weird and wonderful positions, just to minimise the infernal buzz! This led to the development of the "humbucking" pickup. This is again a simple device, imagine two single coil pickups placed side by side and both connected in series - if these pickups were identical, then they would both pick up the same amount of string vibration and background hum: the voltages would be added together but the ration of signal to noise would be the same.

Construction of a typical humbucking pickup

The clever twist that makes the humbucker so effective is that in, one pickup, the permanent magnets are effectively mounted upside down (usually there is only one bar magnet with the North pole touching the base of one set of polepieces, and the South pole touching the other set), and the coil is reversed. This effectively means that the signal produced by the vibrating string is unchanged, whereas the hum signal produced by pickup of stray magnetic fields is reversed (remember that the string signal is produced by the interaction of the magnet and the coil, but the hum is purely picked up by the coil). When the signals from the two coils are mixed together, the signal from the vibrating strings is effectively twice that of a single coil, but the hum signal is reduced to almost zero, as the hum signal from the two coils have opposite polarities. In practice, there will still be a small amount of hum, as the two coils are very rarely identical.

Sunday, August 9, 2009

KP-3Kaoss Pad and microKorg for sale! - SOLD -

For Sale!

Second hand but looks new!
only RM1200 (Reduce Price, Now at RM1000)
Features:-
KAOSS To The Third
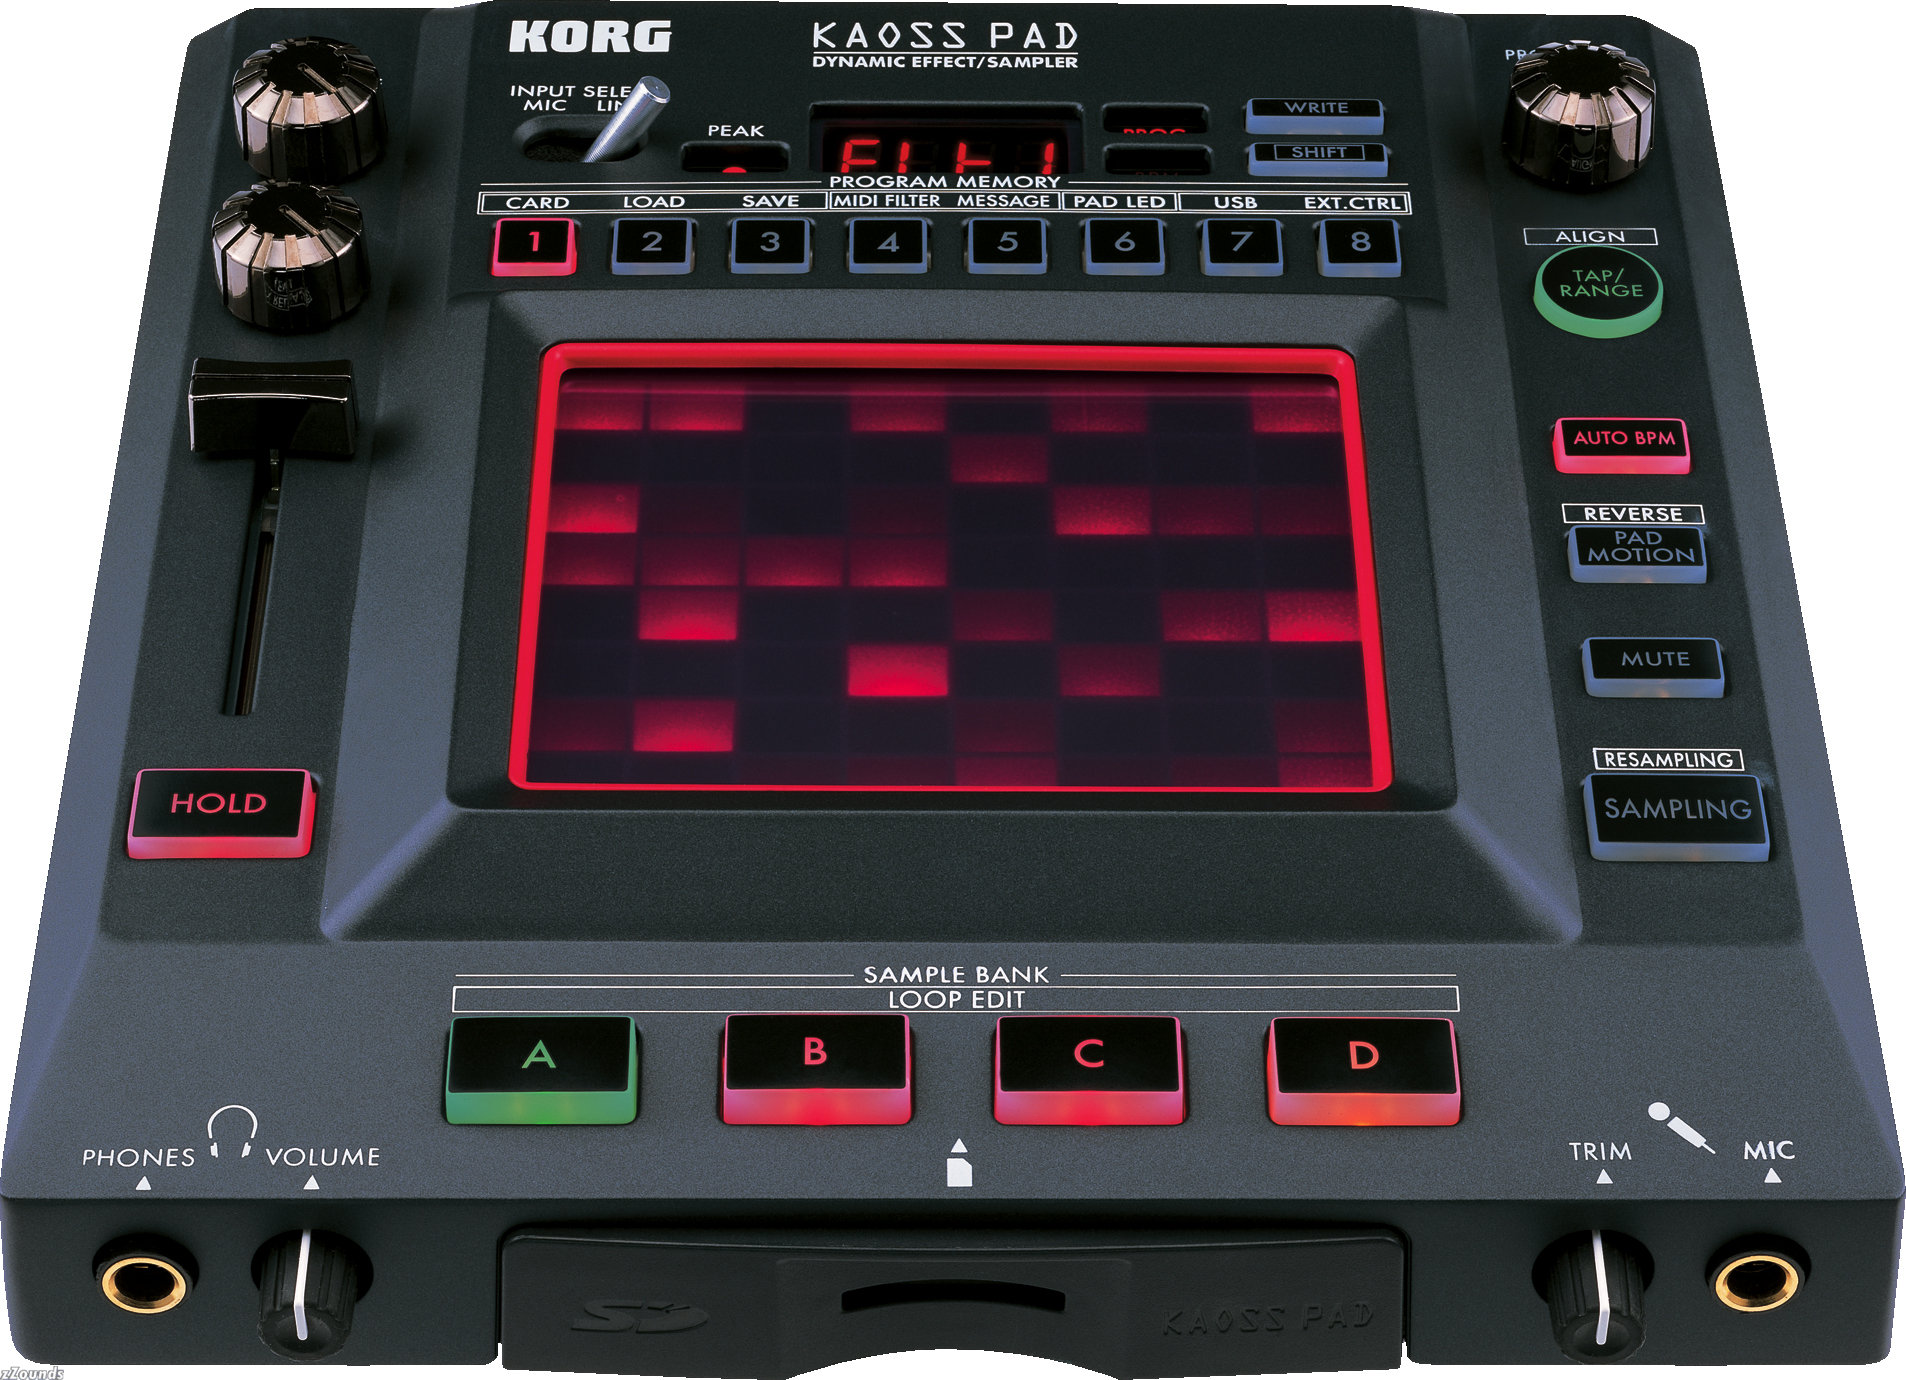
Korg’s KAOSS technology has been embraced by DJs, musicians and producers alike. No other interface is as intuitive, immediate or just plain fun to use. By simply touching, tapping or sliding your finger over the touchpad, the all-new KP3 allows you to control multiple effects parameters and manipulate samples in real time. On stage or in the studio, these gestures and moves can become powerful and expressive performance elements. More than a processor, the KP3 is a complete instrument allowing you to manage, recall, and play back samples; sample on the fly; and add dynamic processing to any audio signal or to the samples themselves. KP3 has 128 all-new effects raning from traditional effects such as delays, flangers and reverbs, to exciting new effects, like grain shifter, decimator, analog style filter with a tone-bending drive circuit and EQs controllable directly from the pad.
Trip The Light Fantastic
The new pad lighting system provides visual cues for the current program, held position, and more – it can even scroll a custom message! This interface offers a whole new level of interaction with the operator.
Sync'd Up
The KP3’s Auto BPM circuit derives tempo information from a turntable or CD player and can sync effects to play in perfect timing, while providing MIDI clock to other devices.
Beyond Effects
Instant drum grooves and RADIAS-inspired vocoder and synthesizer sounds can also be played on the X/Y pad, and, they can be synced to tempo just like the effects.
Capture Contraption
Sampling and effects are totally integrated, so you can sample through the effects, and even resample the output to create powerful, multi-element sounds. Plus, you can sample and resample the synths and drums within the unit KAOSSILATOR style, to create musical phrases on the fly!
Save Yourself!
The KP3 offers a Secure Digital (SD) port, for loading and saving your sample data.
Software Sample Editor
An editor/librarian program is included so you can build libraries of samples and edit them using your computer (via USB)


Another One for SALE, Cheap!

Second hand but looks new!
only RM1500 (Reduce Price RM1300)
Features:-
Introduction

State-of-the-art analog modeling and multi-band vocoding are available in a compact, portable instrument. With 37 keys and 128 user-rewritable programs, the microKORG Synthesizer/Vocoder is perfect for the performer, producer, computer musician or beginner looking for an affordable synthesizer. The microKORG delivers the quality sounds and features you expect from Korg at a price that will astound you.

Powerful synthesis
The microKORG boasts the same dual-oscillator DSP synthesis engine found in Korg's critically acclaimed MS2000 and offers a wider selection of waveforms than any other modeled synth. Oscillator 1 features a total of 71 waveforms . These include traditional analog waves like saw, pulse, sine and noise, plus more unique choices like Vox wave and cross wave. Together they provide a cool selection that can be modulated to produce an extensive range of timbres. In addition, 64 exclusive DWGS waveforms from Korg’s classic DW-8000 enable the microKORG to reproduce a broad collection of imitative sounds. Sounds like bells, electric pianos, guitars, basses and more that would be difficult reproduce on an analog synthesizer. You can also apply Ring and Sync modulation from Oscillator 2 to create the kind of complex timbres that are the true sign of an advanced synthesizer.

Four filter modes are available, offering -12 dB (2-pole) low pass, high pass and band pass configurations plus an extra steep -24 dB (4-pole) low pass setting. All include resonance. Two classic ADSR envelope generators and two MIDI-syncable LFOs provide the power to shape your sounds. Add a Virtual Patch matrix that lets you create advanced modulation settings – routing the Mod Wheel to control filter cutoff or pulse width, using an LFO to control panning or amp level, etc. – and you have performance that is unheard of from a synthesizer in this price range!

Classic vocoding
The microKORG includes an 8-band vocoder with many advanced features. You can capture and “freeze” the formants of your voice, and then play it across the keyboard, or shift the formant frequency to make your voice sound male, female, like a child or just plain wacky! Best of all, the microKORG comes with its own microphone so you can start having fun right away.

A full range of effects
Three types of modulation effects (chorus/flanger, phaser, ensemble), three types of delay effects (stereo, cross, L/R), and a two-band equalizer add the finishing touch to the microKORG. The delays can be synchronized with the arpeggiator or to an external MIDI clock – a great feature for live performances or for laying down tracks. All effects can be edited to create your own, unique sounds.

Great sounds and expression
Korg has used all of the microKorg’s synthesis power in the creation of 128 great-sounding presets. They cover a wide range of the latest musical styles plus many vintage favorites. Sixteen vocoder Programs are also included. The Pitch Bend wheel, Modulation wheel and five other knobs provide flexible realtime control over filter cutoff, attack, release and other important parameters. The Edit Mode allows you to fully edit the existing sounds, or to create your own new ones.

Flexible arpeggiator
Six types of arpeggio patterns (UP, DOWN, ALT1/2, Random, Trigger) are built in, with control over tempo, gate time, swing, and up to a 4-octave range. You can turn individual steps on or off within a pattern, providing the feel and functionality of a step sequencer.

Audio in
Two external audio input jacks are provided, so you can run other instruments, CDs and more through the microKORG’s filter and effects, allowing you to process sounds in truly creative ways.

A compact MIDI controller
The microKORG's compact size is perfect for the musician or DJ looking to add a synth to his or her setup when space is tight. It's also a great choice for use in a computer-based music setup. The five realtime knobs on the front panel can transmit MIDI messages (control changes), so they can be used as controllers for software synthesizers. Use the 37-note velocity-sensitive mini-keyboard for controlling other gear or for recording and editing with your sequencer. And thanks to battery-power, the microKORG is the ultimate portable controller when used with a laptop computer!

Clear control and classic looks
There's no complex menu structure – all parameters are located on the panel for easy access to any function. A large dial and LED illuminated buttons provide easy program selection even on a dark stage. With its beige-gold body, wooden side panels and retro-influenced design, the microKORG has a look that's both vintage and funky.


Contact Admin - Boi : 0195757953

Thursday, August 6, 2009

3 New Dean Guitars For Sale!


3 New Dean Guitars For Sale!!
Prefer only in Klang Valley
Cash and carry
0195757953 - Wan
Dean Dime-o-Flage Snow Camo - RM2500 (Neg)
  • Basswood body
  • Bolt-on maple neck
  • Zebra humbuckers
  • Grover tuners
  • Tune-o-matic bridge
  • 24-3/4" scale
  • 1-11/16" nut width


Dean Razorback Slime Bumblebee - RM4700 (Neg)
  • Floyd Rose Licensed Tremolo
  • Black Hardware
  • Dimebucker treble pickup
  • Mahogany body and neck
  • Rosewood Fingerboard
  • Dimebag Traction Knobs
  • Set Neck Construction
  • Fi


Dean Razorback Shards - RM4700 (Neg)
  • Floyd Rose Licensed Tremolo
  • Black Hardware
  • Dimebucker treble pickup
  • Pearl Razor Inlay
  • Mahogany body and neck
  • Rosewood Fingerboard
  • Dimebag Traction Knobs
  • Set Neck Construction


Hartke Acoustic Amps For Sale!!

For Sale : RM1500

As Usual contact me: Wan Amirul : 0195757953

Specifications:

  • 75 Watt Acoustic Guitar Combo
  • Two 5" Woofers and a 2" x 4" Ribbon High Frequency Transducer
  • 5-Band Graphic EQ
  • Phase Switch and Variable Notch Filter Feedback Control
  • 100 24-Bit Built-In Digital Effects
  • Effects loop and direct output
  • Precision tuned Kickback™ Enclosure
Descriptions:-

Hartke has taken its experience in building great sounding bass amplifiers and brought it to the field of acoustic guitar amplification with the introduction of the Hartke Acoustic Ribbon Series. Perfect to go from the coffee house to the night club, the AC75 is a two channel 75 watt acoustic guitar combo.

Designed in a precision tuned Kickback™ enclosure, with two custom-voiced 5-inch full range drivers which naturally recreate the sound of the acoustic instrument without adding any unwanted coloration or distortion, and a 2-inch by 4-inch ribbon tweeter which adds clarity and overtones to the high end. Channel 1 has active and piezo instrument inputs, with bass and treble controls, while channel two has XLR microphone and RCA line inputs. There is a 5-band graphic EQ and a built-in 100 preset 24-bit digital effects processor, which can be routed to either channel.

The AC75 features a 75 watt bi-amped design, with 50 watts powering the full range speakers and 25 watts powering the high frequency ribbon tweeter. To reduce feedback, there is a phase switch on channel 1 as well as a variable notch filter with depth control. On the rear panel of the amplifier there is an effects loop, and XLR direct outputs.

Simply put the Hartke Acoustic Ribbon ampliļ¬ers sound like your instrument, only louder.

Wednesday, August 5, 2009

BASS Guitar YAMAHA RBX 775 For Sale!

2nd Hand but looks new Bass Guitar

Yamaha RBX 775
RM2000-Reduced! only RM1700
Contact : Wan Amirul - 0195757953

Features and Specs

Body Style : Modern rock
Neck Style : Modern rock
Body Wood : Solid Alder
Neck Wood : Maple
Fingerboard : Rosewood
Frets : 24
Pickups : Dual Humbucking
Hardware : Black
Bridge : Diecast


Monday, July 27, 2009

2 GUITARS & 1 POD X3 LIVE FOR SALE! - SOLD -


2 GUITARS FOR SALE!

1. Jackson King V (In The Middle) :-
STRING THRU BODY.
BLACK.
BOLT ON.

RM 1000 (negg)

2. Dean V (On the Left) :-
String Thru Body
Cherryburst
Bolt on
RM 3000 (Negg)

Sadly the Washburn (On the right side are not for sale)


ANOTHER GOOD DEAL
POD LINE 6 X3 LIVE FOR SALE!!!
In good condition include with bag and etc.!

only RM1700 (Negg)

Please contact me for further information:-
Wan - 0195757953

Monday, July 6, 2009

Adjust Your Truss Rod

In the neck of a guitar there is a metallic rod called the 'truss rod'. This allows the curvature of the guitar neck to be adjusted, which is necessary when changing the string gauge, or when drastic temperature and/or humidity changes occur (for example when moving the guitar from one country to another).

The truss rod in fact looks like this:

Guitar Truss Rod (Loose)

The tension in the strings on a guitar causes the neck to be pulled upwards. This tension obviously varies with string gauge hence why you need to adjust the truss rod when change the string gauge.

When tightened the truss rod itself becomes curved in the opposite direction from the neck (i.e. downwards as shown below). It is this fact that allows the truss rod to counteract the upwards pull caused by the strings.

Guitar Truss Rod (Tight)

5.1.2 Types of Truss Rods

There are many types of truss rods, such as the common single truss rod, the non-adjustable truss rod, the dual action truss rod and the double truss rod.

  • The single truss rod is the truss rod shown in the picture at the top of the page and can be tightened to give the neck back bow (bend the neck downwards to counteract the upwards pull of the strings).
  • The non-adjustable truss rod is placed in some guitars (although not so common), and it is there just to provide reinforcement for the neck.
  • The dual action truss rod can be used to add back bow, but can also be used to increase the curvature of the neck upwards (upwards bow).
  • The double truss rod refers to having two truss rods in the neck. This is so that more force can be applied by the truss rods and is used when in guitars with higher string tension, like a 5 string bass or a 12 string guitar.

5.1.3 The Reason for Requiring a Truss Rod

A string on a guitar basically vibrates in an oval shape. This means that the middle of the string vibrates with greatest amplitude, which you can actually see if you sound an open string. For this reason there needs to be a thing called "relief", which is a bow half way up the neck. This bow prevents the strings from contacting the frets when playing (which causes 'buzzing'). Here are some over-exaggerated diagrams to clarify what I mean:

Truss Rod Too Loose This is an example of where the truss rod is too loose. The relief in the neck is so great that the "action", which is the distance between the string and the fret, is huge. This will cause difficulty in pressing some of the frets and should be readjusted immediately (seek a specialist).

Truss Rod Too Tight This is an example of where the truss rod is too tight (back-bow). The relief is non-existent. This means that either you get "buzzing" or you won't be able to sound an open string at all. Again seek a specialist.

Truss Rod Just Right This is the ideal. There is a small amount of bow in the centre of the neck which accommodates for the way the string vibrates.

5.1.4 Checking Your Neck Relief

Where the Neck Meets the Body on a Guitar There is no such thing as an ideal value for neck relief. It will depend on the set-up of the rest of the guitar and your style of playing etc... The neck relief on a guitar can be roughly estimated by pressing down on the 1st fret, and the fret where the neck meets the body of the guitar.

For example on one of my guitars this would be as shown above by the arrow.

While you are holding these two frets you should check the gap between the string and the top of the 7th fret, where the bow should be greatest. This gives you a general guide to how much relief your guitar has. If this gap is no existent then you either have a completely straight neck or back bow in which case your truss rod should be readjusted.

5.1.5 Adjustment of the Guitar Truss Rod

It's not really advisable to adjust the truss rod yourself unless you really know what you're doing - I would suggest you give it to a professional. However I'll complete this section in case you are curious about how the truss rod is adjusted. I take no responsibility in any damage caused by you adjusting the truss rod yourself.

Access to the Truss Rod The truss rod can usually be accessed from the headstock, and is normally covered by a plastic cover which first needs to be removed.

When adjusting the truss rod the strings should be loosened. Small adjustments should be made, the guitar tuned, and the relief checked. This is should be carried out until the relief is set to the desired amount.

The truss rod adjustment is made using a hexagonal key. Turning the key in a clockwise direction will tighten the truss rod, which will apply a downwards force on the neck. Turning the key in an anti-clockwise direction will loosen the truss rod, allowing the string tension to pull the neck upwards.

Saturday, July 4, 2009

Learn How To Change Strings on a Floyd Rose Guitar


Here's How:
  1. Reset all fine tuning screws located on the bridge to a middle position.
  2. Remove the sixth string from your guitar. To do this, loosen the 'string-lock screw' located at the back side of your bridge using an allen key. The string-lock screws are the screws that run parallel to the body of your guitar.
  3. After several counter-clockwise turns, the string should pop free from the bridge.
  4. Using an allen key, loosen the 'nut clamping block' (the part of the guitar where the neck meets the headstock) that covers the sixth and fifth string.
  5. Once the nut clamping block is loosened, you should be able to extract the string from the guitar.
  6. Now, take your replacement string, and using wire cutters, clip off the ball at the bottom end of the string.
  7. Put the freshly clipped end of the string into the saddle of the bridge. Examine the other strings to see where exactly the new string should go.
  8. Push the string down into the saddle as far as possible. You may have to further loosen the string-lock screw.
  9. Using your allen key, gently but firmly tighten the string-lock screw to hold the string in place (be careful not to over-tighten!) Be sure the string stays secure in the saddle while doing this.
  10. Feed the string under the loosened nut clamping bolt, and under the 'string retainer' (the bar on the headstock that runs parallel to the nut).
  11. Feed the string through the tuning peg, leaving some slack in the string. The string should wrap several times around the peg.
  12. Bring the guitar into approximate tune. Cut away excess string.
  13. Repeat the above steps for each of the remaining five strings. You may need to repeatedly re-tune the guitar.
  14. When all six strings have been changed, tune the guitar as precisely as possible, then tighten the nut clamping bolts. If tuning changes, re-tune using the fine tuning screws.


Tips:

  1. Getting the guitar in tune can be a problem initially. Be patient, and keep re-tuning the guitar.

Friday, July 3, 2009

How to Install Fender Guitar Pickups


Believe it or not installing Fender pickups is not as daunting as it may seem. Fender has several kits available to allow you to simply remove the pick guard of your current ax and replace it with one that has Fender pickups. This article will point you in the right direction of researching and installing Fender pickups in your guitar. For this article, we are going to use the Fender Stratocaster American Standard Guitar as our Fender instrument.

Instructions:

Step 1Buy a complete pickup kit with pickguards. Many companies offer full kits of complete pre-wired pickup assemblies with pickguards. What is terrific about these kits is that you can find the type of Fender sound you want based on the year of production. For example at Acme Guitarworks out of Vero Beach you can find a wide range of assemblies with different wiring options for the type of sound you want. They not only offer modern pickup assemblies but vintage style pickup configurations as well. More important, they sell assemblies with real factory Fender pickups. Regardless of where you purchase your assembly from, it is important that you speak to a costumer service rep to help you determine which assembly is right for your guitar as certain configurations fit certain years. For example if you own a late 1990’s start, a 1962 Strat configuration may not work because the hole configurations are different.
Step 2study the wiring diagram before you begin work. Again, this is your first time so get the big picture from the pros! My personal favorite site is Fender's website--see Resources. They not only offer info on their product lines but also list PDF documents of wiring diagrams for many of their instruments past and present. Below is a diagram downloaded from the Fender site so you can see exactly how they look. It is best that you print this out and keep it with you at all times. In addition, the seller of your assembly should have a diagram available for you, if not a diagram from the Fender site will suffice.

Step 3Stabilize your guitar. A workbench would be ideal, but if this is not available to you, a solid kitchen table will work just as well. You will want to lay a towel on the table to protect both table and instrument. Be sure to support the neck to reduce tension. A low=cost solution is to roll a towel and place it so that it will fit snugly under the neck.
Step 4Remove the strings from the guitar if you have not done so already. I know that there are those you can replace their kits without doing this, but for your first time it would be best to remove them.
Step 5Remove the current assembly, if it has not been done so already. This is done by simply unscrewing the screws and gently removing the pickguard assembly off of the guitar. You will see that the guitar is currently wired. TAKE A PICTURE OF THIS CONFIGURATION BEFORE YOU DISCONNEcT THE WIRING. Believe it or not, in addition to the wiring diagram you have downloaded, you will want to use this as reference.
Step 6Look at the diagram. You are ready to remove the three “ground wires.” You may want to use a solder remover. Some prefer to use a solder gun and heat the solder that is in place. Gently heat the solder on the wires connecting the central ground wire and disconnect that wire. After that, use the gun to disconnect the wires leading to the bridge and then tonal pot terminals. What is great about this, is now that you know how to disconnect the wiring you will know how to connect the wiring to your new assembly.
Step 7Lay the kit assembly onto the guitar and line up the holes to make sure that you do indeed have the correct assembly. Assuming that you do, you are ready to solder the wiring in the reverse order in which you removed them. Again, consult the diagram. Remember the three “ground wires?” Start with the middle one which is to be grounded to the body cavity. That particular wire has a small teardrop shaped metal gamete attached. Solder it to the body cavity. Next, your left wire is to be grounded to your bridge. The right wire is to be grounded to your input jack, the connection for this is the inner connection, which if looking at it directly in the 2 o’clock position, is in the 10 position. Next, take the “ hot wire” and solder that to the jack.
Step 8Plug the guitar into a practice amp and test the magnetic connection before you lay the assembly onto the guitar. Even without strings you will be able to tell if you correctly wired the assembly by plugging in the guitar and testing for a magnetic connection. You should hear a slight hum. Also, test the pickup toggle switches and volume and tonal pots. Once you are certain that there is a magnetic connection, unplug the guitar, and then lay the assembly into the guitar and screw it into place.
Step 9Re-string your guitar and test to see if it sounds as you want it. Before you start jamming, test all of the pots and volume controls. If satisfied, then you are ready to rock. If not, go back to Step 5 and see if you missed something along the way.

Memo
What you need:-
  • 100 watt soldering gun (pot ground soldering)
  • Phillips screwdriver
  • 20 to 30 watt soldering iron (solder, tip cleaner)
  • Something to protect your guitar's finish
  • Wire cutters/strippers
  • Solder sucker or wick solder remover
  • Patience

Tune Your Guitar EADGBE


Grab your guitar and start tuning!

Wednesday, July 1, 2009

Standard Wiring For Fender & Gibson Guitars

Volume and Tone Controls

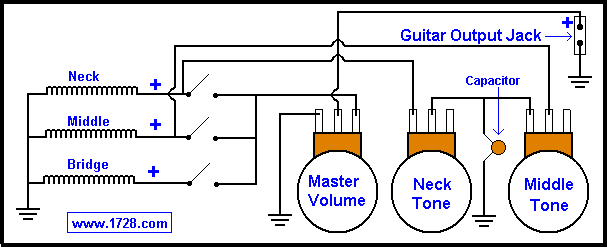
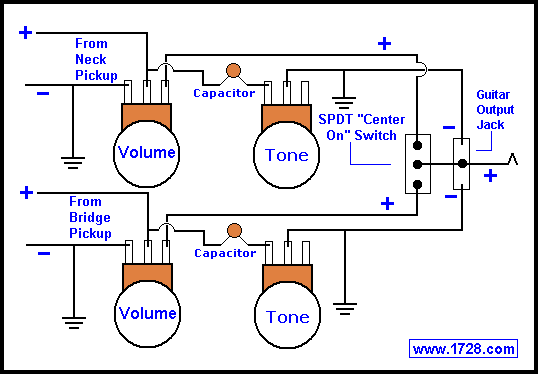
NOTE: In these diagrams, the volume and tone controls are viewed from the rear. The volume and tone controls are variable resistors, also known as potentiometers (or "pots" for short). In electric guitars, the values for either of these usually is about 250K to 1 megohm. The capacitor in the circuit is for the tone control and these values usually are from .02 to .047 mfd (short for microfarad).

The top diagram shows the way in which Fender wires its volume control. (This is the best way to wire a master volume control). Fender generally uses 250K "pots" and .02 mfd capacitors.
The bottom diagram shows the wiring that Gibson uses for its volume controls. (This is the best wiring method when you are using a volume and tone control for each pickup).
Gibson generally uses 500K "pots", .047 mfd capacitors for the neck tone and .02 mfd capacitors for the bridge tone control.