Monday, July 27, 2009
2 GUITARS & 1 POD X3 LIVE FOR SALE! - SOLD -
2 GUITARS FOR SALE!
1. Jackson King V (In The Middle) :-
STRING THRU BODY.
BLACK.
BOLT ON.
RM 1000 (negg)
2. Dean V (On the Left) :-
String Thru Body
Cherryburst
Bolt on
RM 3000 (Negg)
Sadly the Washburn (On the right side are not for sale)
ANOTHER GOOD DEAL
POD LINE 6 X3 LIVE FOR SALE!!!
In good condition include with bag and etc.!
only RM1700 (Negg)
Please contact me for further information:-
Wan - 0195757953
Monday, July 6, 2009
Adjust Your Truss Rod
In the neck of a guitar there is a metallic rod called the 'truss rod'. This allows the curvature of the guitar neck to be adjusted, which is necessary when changing the string gauge, or when drastic temperature and/or humidity changes occur (for example when moving the guitar from one country to another).
The truss rod in fact looks like this:
The tension in the strings on a guitar causes the neck to be pulled upwards. This tension obviously varies with string gauge hence why you need to adjust the truss rod when change the string gauge.
When tightened the truss rod itself becomes curved in the opposite direction from the neck (i.e. downwards as shown below). It is this fact that allows the truss rod to counteract the upwards pull caused by the strings.
5.1.2 Types of Truss Rods
There are many types of truss rods, such as the common single truss rod, the non-adjustable truss rod, the dual action truss rod and the double truss rod.
- The single truss rod is the truss rod shown in the picture at the top of the page and can be tightened to give the neck back bow (bend the neck downwards to counteract the upwards pull of the strings).
- The non-adjustable truss rod is placed in some guitars (although not so common), and it is there just to provide reinforcement for the neck.
- The dual action truss rod can be used to add back bow, but can also be used to increase the curvature of the neck upwards (upwards bow).
- The double truss rod refers to having two truss rods in the neck. This is so that more force can be applied by the truss rods and is used when in guitars with higher string tension, like a 5 string bass or a 12 string guitar.
5.1.3 The Reason for Requiring a Truss Rod
A string on a guitar basically vibrates in an oval shape. This means that the middle of the string vibrates with greatest amplitude, which you can actually see if you sound an open string. For this reason there needs to be a thing called "relief", which is a bow half way up the neck. This bow prevents the strings from contacting the frets when playing (which causes 'buzzing'). Here are some over-exaggerated diagrams to clarify what I mean:
This is an example of where the truss rod is too loose. The relief in the neck is so great that the "action", which is the distance between the string and the fret, is huge. This will cause difficulty in pressing some of the frets and should be readjusted immediately (seek a specialist).
This is an example of where the truss rod is too tight (back-bow). The relief is non-existent. This means that either you get "buzzing" or you won't be able to sound an open string at all. Again seek a specialist.
This is the ideal. There is a small amount of bow in the centre of the neck which accommodates for the way the string vibrates.
5.1.4 Checking Your Neck Relief
There is no such thing as an ideal value for neck relief. It will depend on the set-up of the rest of the guitar and your style of playing etc... The neck relief on a guitar can be roughly estimated by pressing down on the 1st fret, and the fret where the neck meets the body of the guitar.
For example on one of my guitars this would be as shown above by the arrow.
While you are holding these two frets you should check the gap between the string and the top of the 7th fret, where the bow should be greatest. This gives you a general guide to how much relief your guitar has. If this gap is no existent then you either have a completely straight neck or back bow in which case your truss rod should be readjusted.
5.1.5 Adjustment of the Guitar Truss Rod
It's not really advisable to adjust the truss rod yourself unless you really know what you're doing - I would suggest you give it to a professional. However I'll complete this section in case you are curious about how the truss rod is adjusted. I take no responsibility in any damage caused by you adjusting the truss rod yourself.
The truss rod can usually be accessed from the headstock, and is normally covered by a plastic cover which first needs to be removed.
When adjusting the truss rod the strings should be loosened. Small adjustments should be made, the guitar tuned, and the relief checked. This is should be carried out until the relief is set to the desired amount.
The truss rod adjustment is made using a hexagonal key. Turning the key in a clockwise direction will tighten the truss rod, which will apply a downwards force on the neck. Turning the key in an anti-clockwise direction will loosen the truss rod, allowing the string tension to pull the neck upwards.
Saturday, July 4, 2009
Learn How To Change Strings on a Floyd Rose Guitar
Here's How:
- Reset all fine tuning screws located on the bridge to a middle position.
- Remove the sixth string from your guitar. To do this, loosen the 'string-lock screw' located at the back side of your bridge using an allen key. The string-lock screws are the screws that run parallel to the body of your guitar.
- After several counter-clockwise turns, the string should pop free from the bridge.
- Using an allen key, loosen the 'nut clamping block' (the part of the guitar where the neck meets the headstock) that covers the sixth and fifth string.
- Once the nut clamping block is loosened, you should be able to extract the string from the guitar.
- Now, take your replacement string, and using wire cutters, clip off the ball at the bottom end of the string.
- Put the freshly clipped end of the string into the saddle of the bridge. Examine the other strings to see where exactly the new string should go.
- Push the string down into the saddle as far as possible. You may have to further loosen the string-lock screw.
- Using your allen key, gently but firmly tighten the string-lock screw to hold the string in place (be careful not to over-tighten!) Be sure the string stays secure in the saddle while doing this.
- Feed the string under the loosened nut clamping bolt, and under the 'string retainer' (the bar on the headstock that runs parallel to the nut).
- Feed the string through the tuning peg, leaving some slack in the string. The string should wrap several times around the peg.
- Bring the guitar into approximate tune. Cut away excess string.
- Repeat the above steps for each of the remaining five strings. You may need to repeatedly re-tune the guitar.
- When all six strings have been changed, tune the guitar as precisely as possible, then tighten the nut clamping bolts. If tuning changes, re-tune using the fine tuning screws.
Tips:
- Getting the guitar in tune can be a problem initially. Be patient, and keep re-tuning the guitar.
Friday, July 3, 2009
How to Install Fender Guitar Pickups
Instructions:
Step 2study the wiring diagram before you begin work. Again, this is your first time so get the big picture from the pros! My personal favorite site is Fender's website--see Resources. They not only offer info on their product lines but also list PDF documents of wiring diagrams for many of their instruments past and present. Below is a diagram downloaded from the Fender site so you can see exactly how they look. It is best that you print this out and keep it with you at all times. In addition, the seller of your assembly should have a diagram available for you, if not a diagram from the Fender site will suffice.
Step 4Remove the strings from the guitar if you have not done so already. I know that there are those you can replace their kits without doing this, but for your first time it would be best to remove them.
Step 5Remove the current assembly, if it has not been done so already. This is done by simply unscrewing the screws and gently removing the pickguard assembly off of the guitar. You will see that the guitar is currently wired. TAKE A PICTURE OF THIS CONFIGURATION BEFORE YOU DISCONNEcT THE WIRING. Believe it or not, in addition to the wiring diagram you have downloaded, you will want to use this as reference.
Step 6Look at the diagram. You are ready to remove the three “ground wires.” You may want to use a solder remover. Some prefer to use a solder gun and heat the solder that is in place. Gently heat the solder on the wires connecting the central ground wire and disconnect that wire. After that, use the gun to disconnect the wires leading to the bridge and then tonal pot terminals. What is great about this, is now that you know how to disconnect the wiring you will know how to connect the wiring to your new assembly.
Step 7Lay the kit assembly onto the guitar and line up the holes to make sure that you do indeed have the correct assembly. Assuming that you do, you are ready to solder the wiring in the reverse order in which you removed them. Again, consult the diagram. Remember the three “ground wires?” Start with the middle one which is to be grounded to the body cavity. That particular wire has a small teardrop shaped metal gamete attached. Solder it to the body cavity. Next, your left wire is to be grounded to your bridge. The right wire is to be grounded to your input jack, the connection for this is the inner connection, which if looking at it directly in the 2 o’clock position, is in the 10 position. Next, take the “ hot wire” and solder that to the jack.
Step 8Plug the guitar into a practice amp and test the magnetic connection before you lay the assembly onto the guitar. Even without strings you will be able to tell if you correctly wired the assembly by plugging in the guitar and testing for a magnetic connection. You should hear a slight hum. Also, test the pickup toggle switches and volume and tonal pots. Once you are certain that there is a magnetic connection, unplug the guitar, and then lay the assembly into the guitar and screw it into place.
Step 9Re-string your guitar and test to see if it sounds as you want it. Before you start jamming, test all of the pots and volume controls. If satisfied, then you are ready to rock. If not, go back to Step 5 and see if you missed something along the way.
Memo
What you need:-
- 100 watt soldering gun (pot ground soldering)
- Phillips screwdriver
- 20 to 30 watt soldering iron (solder, tip cleaner)
- Something to protect your guitar's finish
- Wire cutters/strippers
- Solder sucker or wick solder remover
- Patience
Wednesday, July 1, 2009
Standard Wiring For Fender & Gibson Guitars
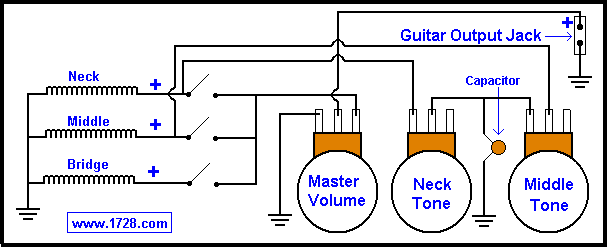
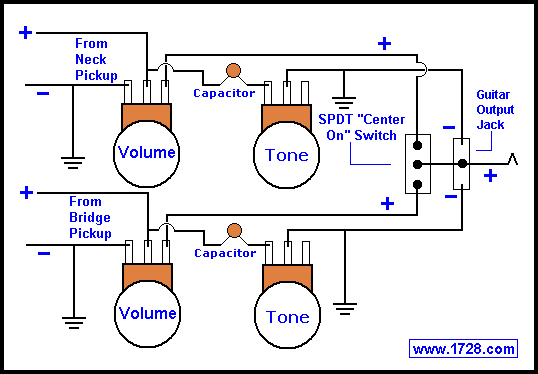
NOTE: In these diagrams, the volume and tone controls are viewed from the rear. The volume and tone controls are variable resistors, also known as potentiometers (or "pots" for short). In electric guitars, the values for either of these usually is about 250K to 1 megohm. The capacitor in the circuit is for the tone control and these values usually are from .02 to .047 mfd (short for microfarad).
The top diagram shows the way in which Fender wires its volume control. (This is the best way to wire a master volume control). Fender generally uses 250K "pots" and .02 mfd capacitors.
The bottom diagram shows the wiring that Gibson uses for its volume controls. (This is the best wiring method when you are using a volume and tone control for each pickup).
Gibson generally uses 500K "pots", .047 mfd capacitors for the neck tone and .02 mfd capacitors for the bridge tone control.